Essential Tips for Monitoring Blood Glucose
at Home
Monitoring blood glucose levels at home is a cornerstone of effective diabetes management. (Essential Tips for Monitoring Blood Glucose at Home) For millions of people living with diabetes, whether type 1, type 2, or gestational, keeping track of blood sugar fluctuations empowers individuals to make informed decisions about their diet, exercise, medication, and overall lifestyle.
This practice not only helps prevent short-term complications like hypoglycemia (low blood sugar) or hyperglycemia (high blood sugar) but also reduces the long-term risks of heart disease, kidney damage, nerve issues, and vision problems.
In an era where diabetes affects over 38 million Americans, home monitoring has become more accessible thanks to advanced technology like portable glucose meters and continuous glucose monitors (CGMs).
Why is home monitoring so essential? Blood glucose levels can vary dramatically throughout the day due to factors such as meals, physical activity, stress, illness, and even hormonal changes.
Without regular checks, these fluctuations might go unnoticed, leading to dangerous spikes or drops. Home testing allows for real-time insights, enabling adjustments to insulin doses, meal plans, or activity levels.
For instance, if you’re on insulin therapy, frequent monitoring can help you avoid severe lows that cause dizziness, confusion, or even seizures. Similarly, for those managing type 2 diabetes through diet and oral medications, tracking helps confirm that your strategies are working effectively.
The beauty of home monitoring lies in its convenience and empowerment. No longer do patients need to rely solely on periodic doctor visits or lab tests; devices like glucometers provide instant results in the comfort of their own home.
According to health experts, consistent monitoring can improve glycemic control, as measured by A1C levels, which reflect average blood sugar over two to three months. (Essential Tips for Monitoring Blood Glucose at Home)
This can lead to better energy levels, fewer hospital visits, and an enhanced quality of life. However, success depends on proper technique, the right tools, and understanding your results.
In this comprehensive guide, we’ll explore essential tips for monitoring blood glucose at home, from selecting equipment to interpreting data.
We’ll also share inspiring success stories from individuals who’ve transformed their health through diligent tracking, answer frequently asked questions, and include important disclaimers.
Whether you’re newly diagnosed or looking to refine your routine, these insights, drawn from trusted sources like the Mayo Clinic, Cleveland Clinic, American Diabetes Association, and CDC, will help you take control of your diabetes management.
Why Monitor Blood Glucose at Home?
Monitoring blood glucose at home is vital for anyone with diabetes because it provides critical data on how your body is responding to treatment, food, exercise, and other influences. (Essential Tips for Monitoring Blood Glucose at Home)
It helps you and your healthcare team assess the effectiveness of your diabetes management plan and make necessary adjustments to prevent complications. For people with type 1 diabetes, who produce little to no insulin, monitoring is often a daily necessity to guide insulin dosing and avoid life-threatening lows or highs.
In type 2 diabetes, where the body may not use insulin efficiently, home checks reveal patterns that inform lifestyle changes or medication tweaks.
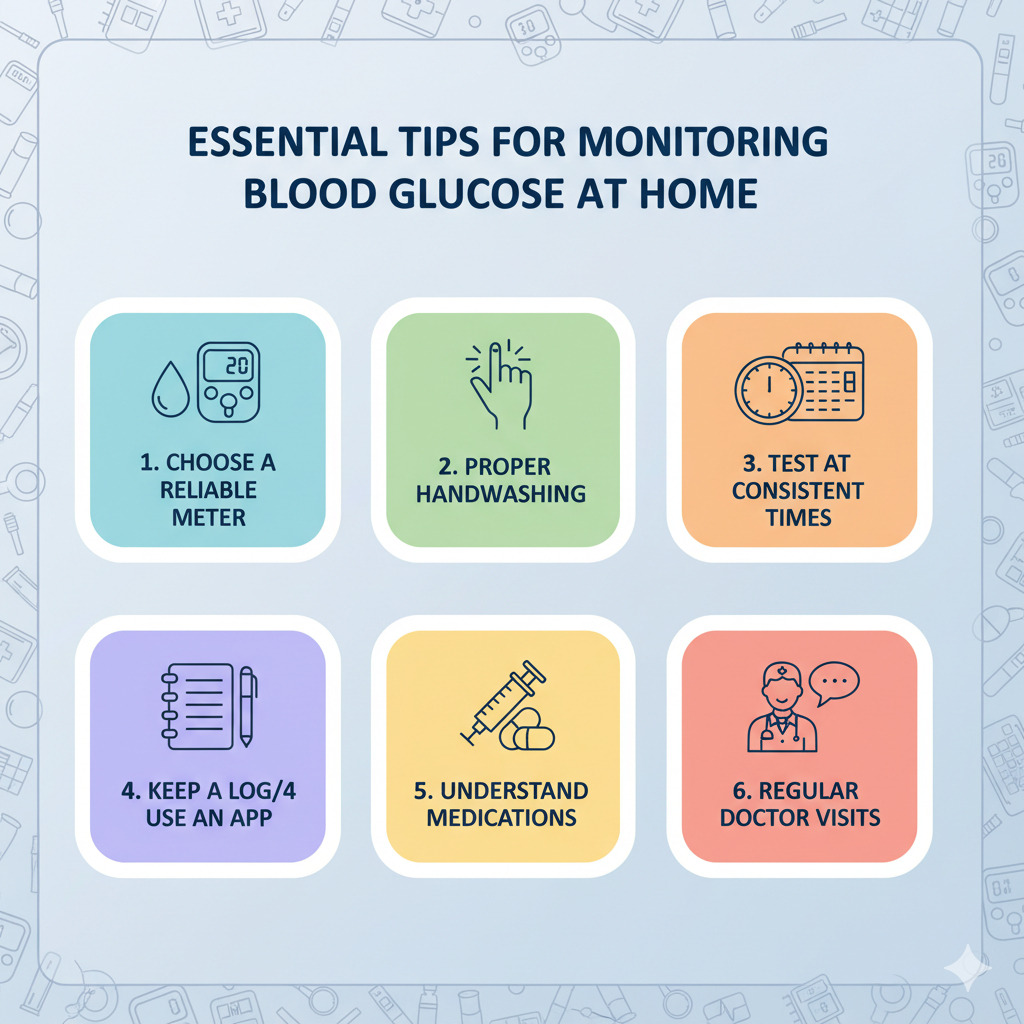
Key benefits include tracking the impact of diabetes medications on blood sugar levels, identifying if levels are too high or low, and understanding how diet, exercise, illness, or stress affect them. (Essential Tips for Monitoring Blood Glucose at Home)
Regular monitoring can help you reach your treatment goals, such as maintaining an A1C below 7% for most adults, which correlates to an average blood glucose of less than 154 mg/dL.
It also empowers you to act quickly, for example, consuming fast-acting carbs like juice during a low or adjusting insulin for a high.
Without monitoring, unmanaged blood sugar can lead to acute issues like diabetic ketoacidosis (DKA) or chronic problems like neuropathy. Factors like missing meals, alcohol, or non-diabetes meds can unpredictably alter levels, making home checks indispensable.
Ultimately, home monitoring fosters independence, reduces healthcare costs by preventing emergencies, and supports long-term health.
Choosing the Right Blood Glucose Meter
Selecting the appropriate blood glucose meter is the first step toward effective home monitoring. There are two primary types: traditional glucometers, which use finger-stick blood samples for spot checks, and continuous glucose monitors (CGMs), which provide ongoing readings via a sensor under the skin.
For glucometers, consider factors like ease of use, cost, insurance coverage, and features such as data storage or app connectivity. Basic models display results quickly but may require larger blood samples.
Advanced ones might include backlit screens for low-light testing, voice guidance for those with vision impairments, or Bluetooth syncing to smartphones for logging trends.
Popular brands like Accu-Chek, OneTouch, and Contour offer reliable options, often available at pharmacies or online. (Essential Tips for Monitoring Blood Glucose at Home)
CGMs, such as Dexcom or FreeStyle Libre, are ideal for frequent checkers, especially type 1 diabetics or insulin users. They measure interstitial fluid glucose every few minutes, sending data to a receiver or phone app, with alarms for highs or lows. Sensors last 10-14 days, and some don’t require calibration with finger sticks. However, they can be pricier, though insurance often covers them for eligible patients.
When choosing, consult your doctor about your diabetes type, monitoring frequency, and budget. Check for FDA approval to ensure accuracy. Also, factor in test strip costs, as they’re ongoing expenses.
Look for affordable generics or patient assistance programs. If you have dexterity issues, opt for meters with large buttons or auto-lancing. For tech-savvy users, app-integrated devices allow sharing data with your healthcare team seamlessly.
Remember, no device is perfect; CGMs may need occasional finger-stick confirmation if readings don’t match symptoms. Test a few models if possible, and always read the user manual for setup and maintenance.
Step-by-Step Guide to Testing Blood Sugar
Proper technique is crucial for accurate blood glucose readings. Here’s a detailed guide for using a traditional glucometer:
- Prepare Your Supplies: Gather your meter, test strips, lancet device, alcohol wipes, and a sharps container for disposal. Ensure the meter is charged or has fresh batteries, and check that test strips aren’t expired—expired strips can give false readings. (Essential Tips for Monitoring Blood Glucose at Home)
- Wash Your Hands: Use warm soap and water, then dry thoroughly. Avoid lotions or scented soaps, as residues can skew results. If water isn’t available, use an alcohol wipe, but let it dry completely to prevent stinging or inaccurate readings.
- Insert the Test Strip: Turn on the meter and insert a strip. Most meters auto-activate. Follow your device’s specific instructions. (Essential Tips for Monitoring Blood Glucose at Home)
- Prick Your Finger: Load a fresh lancet into the lancing device. Set it to a shallow depth to minimize pain—start low and adjust as needed. Prick the side of your fingertip, not the pad, where there are fewer nerve endings. Alternate fingers to avoid soreness. Gently squeeze if blood doesn’t flow easily, but don’t force it.
- Apply Blood to the Strip: Touch the drop to the strip’s edge. Use the required amount—modern strips need just a tiny drop. Wait for the meter to process (usually 5-10 seconds).
- Read and Record the Result: Note the number, along with time, date, and context (e.g., before meal, after exercise). Use an app, logbook, or the meter’s memory.
- Dispose Safely: Eject the strip and lancet into a sharps container. Never reuse lancets to prevent infection.
For accuracy, test at room temperature and store supplies away from heat, humidity, or direct sunlight. If using alternate sites like the forearm, note that readings may lag behind fingertip results, especially during rapid changes. Clean your meter regularly as per instructions. If results seem off, run a control solution test or consult your doctor. (Essential Tips for Monitoring Blood Glucose at Home)
Practice makes perfect. Many diabetes educators offer hands-on training. With consistent technique, you’ll gain confidence and reliable data for better management.
When and How Often to Test
The frequency of blood glucose testing varies based on your diabetes type, treatment, and health status. Always follow your doctor’s advice.
For type 1 diabetes, you may need to test 4-10 times daily, including before meals and snacks, before and after exercise, at bedtime, and occasionally overnight. Test more if ill, changing routines, or starting new meds. Insulin users with type 2 might check several times a day, often before meals and bedtime. Those on non-insulin therapies may test less, perhaps only when symptomatic or during adjustments.
Key times include:
- Upon waking (fasting level).
- Before and 1-2 hours after meals to assess food impact.
- Before, during, and after exercise.
- Before driving or operating machinery.
- When feeling symptoms of high/low sugar.
- During illness or stress.
If pregnant or post-surgery, increase frequency. CGM users get continuous data but may still need finger sticks for calibration.
Discuss personalized targets with your provider—factors like age, complications, and pregnancy influence plans. Consistent timing helps spot patterns, like post-meal spikes, for proactive changes. (Essential Tips for Monitoring Blood Glucose at Home)
Interpreting Your Results
Understanding your blood glucose readings is key to action. Target ranges are personalized but generally:
- Before meals: 80-130 mg/dL.
- 1-2 hours after meals: Under 180 mg/dL.
- A1C: Less than 7% for most adults.
If below 70 mg/dL (hypoglycemia), treat with 15 grams of fast carbs (e.g., glucose tablets, juice) and retest in 15 minutes. Severe lows require glucagon or emergency help.
Above 180 mg/dL (hyperglycemia) may need insulin adjustment or activity. Persistent highs over 240 mg/dL warrant ketone checks to avoid DKA symptoms, including nausea, fatigue.
Log patterns: Consistent morning highs might indicate the “dawn phenomenon,” requiring med tweaks. Share logs at appointments for expert input. Remember, numbers aren’t judgments. Use them to refine your plan.
Advanced Monitoring: Continuous Glucose Monitors
(CGMs)
CGMs represent a leap in home monitoring technology, offering real-time glucose trends without constant finger sticks. A small sensor inserted under the skin (usually abdomen or arm) measures interstitial fluid glucose every 1-5 minutes, transmitting data to a receiver, smartphone, or insulin pump.
Benefits include trend arrows showing if sugar is rising/falling, customizable alarms for highs/lows, and data sharing with caregivers. Some integrate with pumps for automated insulin delivery. Sensors last 10-14 days; implanted versions up to 6 months.
However, CGMs aren’t foolproof; factors like acetaminophen or ascorbic acid can interfere with older models, though newer ones are more resistant. Calibration with finger sticks may be needed, and they’re not ideal during pregnancy or dialysis without a doctor’s approval.
If considering a CGM, discuss with your provider about brands like Medtronic or Eversense. Insurance coverage has improved, but costs vary. CGMs enhance safety, especially for those with hypoglycemia unawareness, leading to better control and fewer emergencies.
Lifestyle Tips to Manage Blood Sugar Levels
Beyond monitoring, lifestyle plays a huge role in stable blood glucose. Drink plenty of water to help flush excess sugar. Focus on a balanced diet: Choose whole grains, veggies, lean proteins, and healthy fats over sugary or processed foods. Portion control and carb counting prevent spikes.
Exercise regularly, aim for 150 minutes weekly of moderate activity like walking or swimming, which improves insulin sensitivity. Test before/after to adjust. Manage stress through meditation or yoga, as cortisol raises sugar.
Limit alcohol and avoid smoking. Get 7-9 hours of sleep nightly, as poor sleep disrupts hormones. Track how these factors affect readings in your log.
Work with a dietitian for personalized plans. Small changes, like swapping soda for herbal tea, can yield big results in glucose control.
Common Mistakes and How to Avoid Them
Avoid pitfalls like using expired strips; always check dates. Don’t test with dirty hands; food residue inflates readings. Skipping logs misses patterns; use apps for ease.
Ignoring symptoms despite normal readings? CGMs can lag; confirm with finger sticks. Over-testing causes burnout; stick to your plan.
Store supplies properly; extreme temperatures damage them. Reuse lancets? Risk of infection. Review technique periodically with your educator to stay accurate.
Success Stories
Real people have turned their diabetes management around through home blood glucose monitoring. These stories highlight the transformative power of consistent tracking.
Roger’s Journey: Diagnosed with type 2 diabetes in 2019, Roger from New Jersey struggled with fatigue and high A1C. He started using a glucometer four times daily, logging meals and walks. Within months, his A1C dropped from 9% to 6.5%. “Monitoring showed me how carbs affected me—I swapped rice for veggies and felt energized,” he shares. Today, he’s active and medication-free, crediting home checks for his turnaround.
Sophie’s Experience: Living with type 1 diabetes, Sophie from the UK adopted a CGM after frequent lows disrupted her life. The device alerted her to trends, allowing precise insulin adjustments. “It beeps before I crash, it’s life-changing,” she says. Her HbA1c improved, and she regained confidence in daily activities like exercising.
Patient at UCHealth: Through a remote monitoring program, a Colorado patient with uncontrolled diabetes used connected meters for coaching. Coaches reviewed data, suggesting tweaks like timing meals. Blood sugar stabilized, reducing ER visits. “Technology and support made management easier,” they note.
Henry Ford Health Story: A Detroit patient with type 2 integrated home monitoring with educator guidance. Testing revealed post-meal spikes, leading to dietary shifts. They lost weight, lowered meds, and avoided complications. “It’s empowering to see progress,” they reflect.
These tales show that with dedication, home monitoring leads to better health and independence.
Disclaimer
This article is for informational purposes only and does not constitute medical advice, diagnosis, or treatment. Always consult your healthcare provider or a certified diabetes educator before starting or changing any monitoring routine, medication, or lifestyle plan. Individual needs vary based on health status, and improper monitoring can lead to harm. The authors and publishers are not responsible for any adverse effects from applying this information.
FAQs
- Why is blood sugar monitoring important? Monitoring helps track treatment effectiveness, identify patterns, and prevent complications by adjusting diet, exercise, or meds.
- How often should I check my blood sugar? It depends on your diabetes type and plan—type 1 may need 4-10 times daily, type 2 less. Ask your doctor.
- What are the steps to test blood sugar at home? Wash your hands, insert the strip, prick the finger side, apply blood, read the result, and log it.
- What if I can’t get enough blood for the test? Warm your hands first to improve flow.
- How do I store test strips? Keep in a tightly closed container, away from moisture, heat, or cold.
- What are the target blood sugar ranges? Before meals: 80-130 mg/dL; after: under 180 mg/dL. Personalize with your doctor.
- How often should I test A1C? At least twice a year, or more if not meeting targets.
- Can I use alternate sites besides fingertips? Yes, like forearms, but they’re less accurate during rapid changes.
- Do medications affect CGM accuracy? Some like acetaminophen can; check with your provider.
- What if monitoring feels overwhelming? Seek diabetes education programs for support and training.
- Should I share my meter with others? No, to avoid infection risks.
- How do I clean my meter? Follow the manual, usually with mild soap or alcohol wipes.
- Can non-diabetics benefit from monitoringGenerallyyy no, as studies don’t show health improvements for healthy people.
- What if my readings are inconsistent? Check technique, strip expiration, and meter calibration; consult your doctor.
- How does exercise affect blood sugar? It usually lowers it, but test before/after to manage. (Essential Tips for Monitoring Blood Glucose at Home)
Conclusion
Monitoring blood glucose at home is an empowering tool for diabetes management, offering insights that lead to healthier living. By following these essential tips, from proper testing techniques to interpreting results and incorporating lifestyle changes, you can achieve better control and reduce risks. Remember the success stories: Consistent effort pays off. Always work with your healthcare team for tailored advice. With the right approach, you can thrive with diabetes.